
Updated 09/01/2022
The LEGO Technic 42143 Ferrari Daytona SP3 is a great 1:8 scale supercar set, you can check my detailed building reviews here. Unfortunately the building instructions were released originally with several errors, I created this blog post to list what was found by myself and the community, and an indication whether they were corrected in the digital version or not.
The manual received a bigger update at the end of August 2022, the major issues are now fixed, as previously I strongly suggest to use the digital version of the manual.
You can see all the previously found issues listed below, with the indication whether it is fixed now in the latest digital version of the instructions or not.
Here’s the video about all the changes:
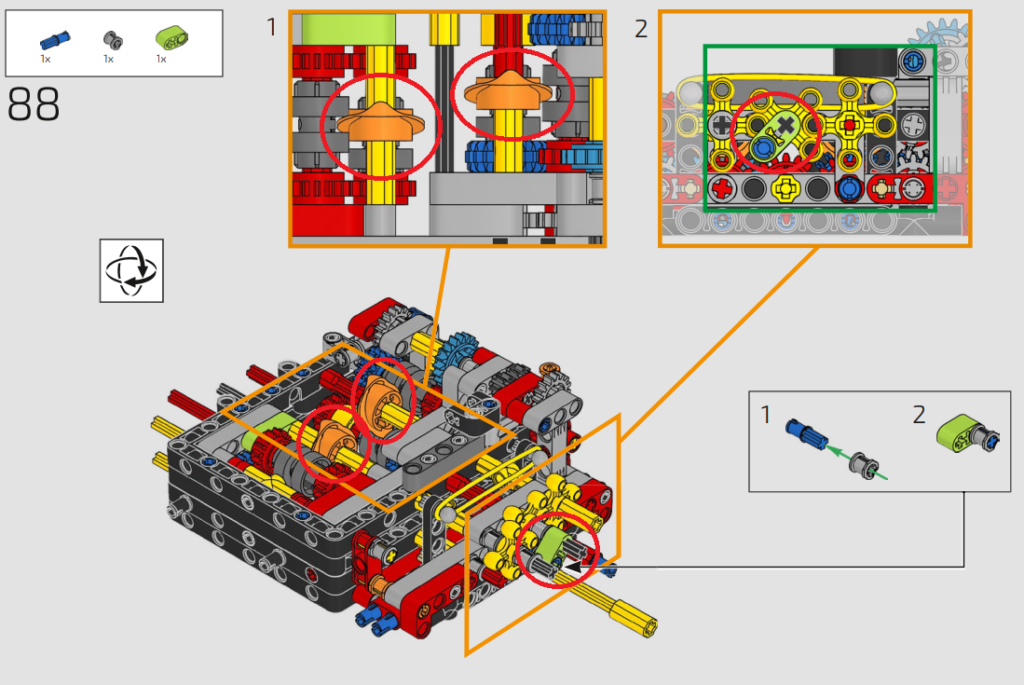
Step 88 (fixed)
In the paper manual the orientation of the 2 orange wave selectors and the green 2L beam relative to each other was incorrect, more details about this in my video. In the updated version the 2 orange wave selectors are rotated, but their position was not updated in the previous or following steps so you need to pay extra attention. They should look exactly like this when you add the green 2L beam:
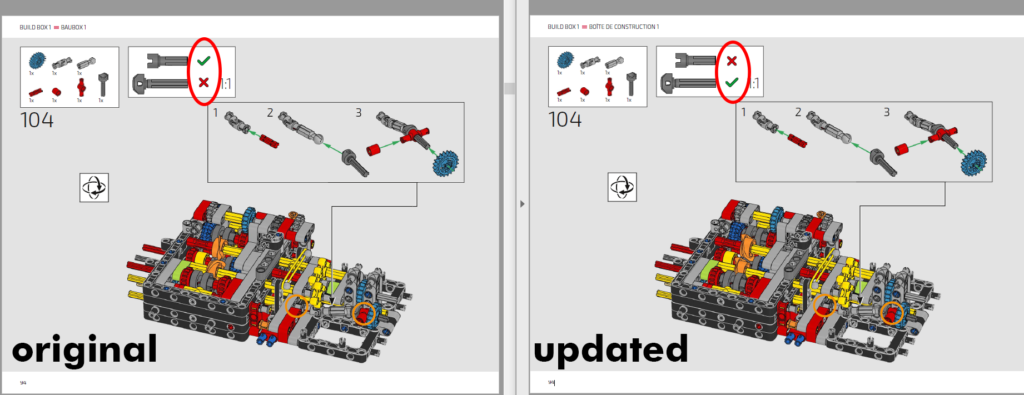
Step 104 (fixed)
The part usage callout on top was incorrect, you have to use the part at the bottom and not the one on the top, the green checkmark and the red X was swapped.
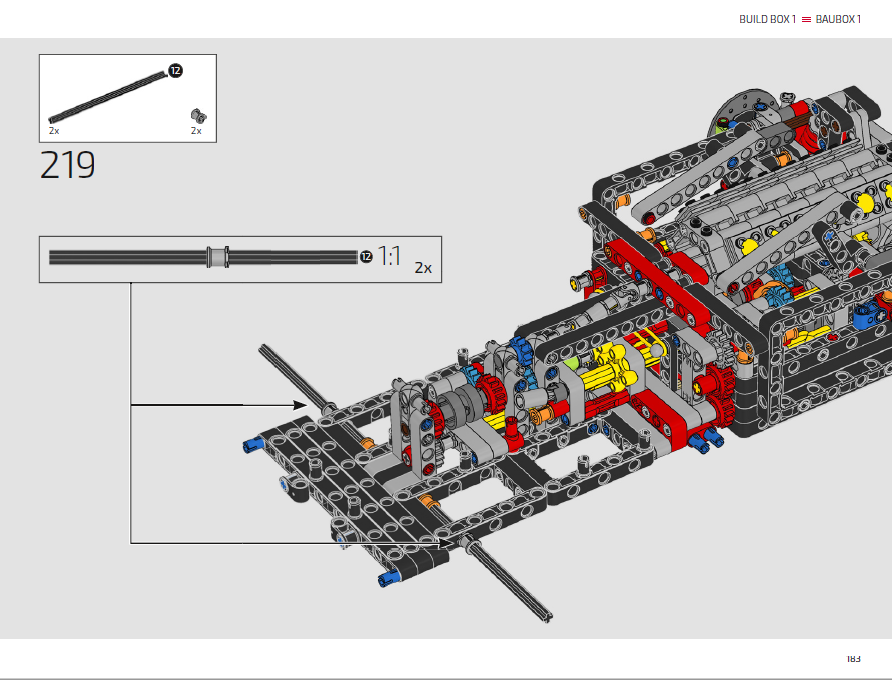
Step 219 (not fixed yet)
This is not really an error, but easy to misunderstand. The assembly image shows the light bluish grey bush in the middle of the axle, but when you push the axle in place the bush has to be closer to the end that goes in the orange connector
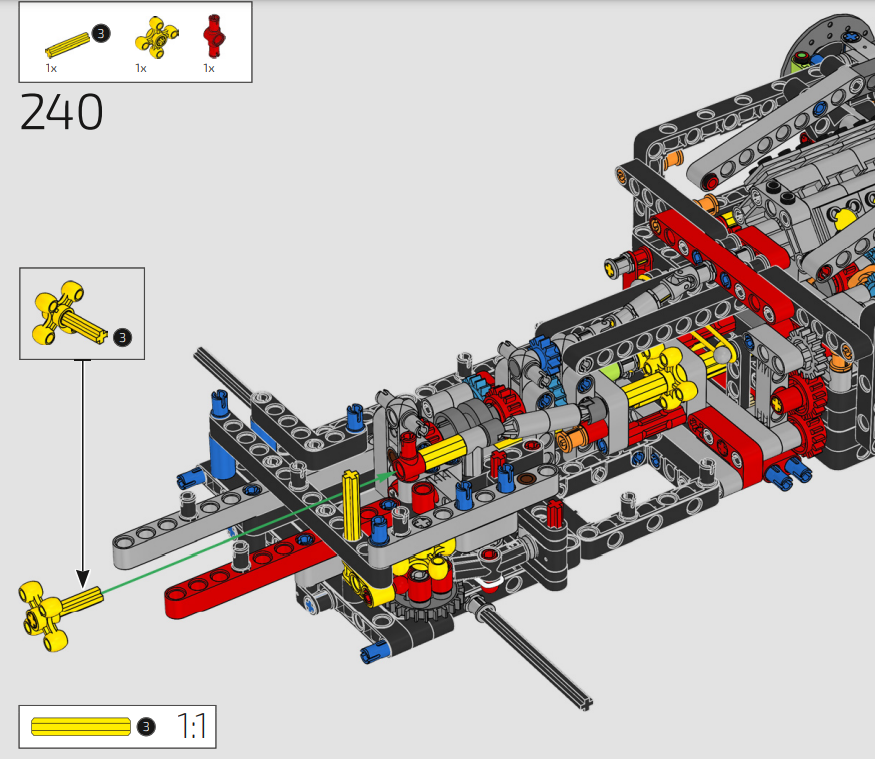
Step 240 (not fixed yet)
A minor error, if the knob gear is in this position forming an X then the axle cannot be inserted in this position forming a +. Both the axle and the knob gear will have the + orientation when inserted in place.
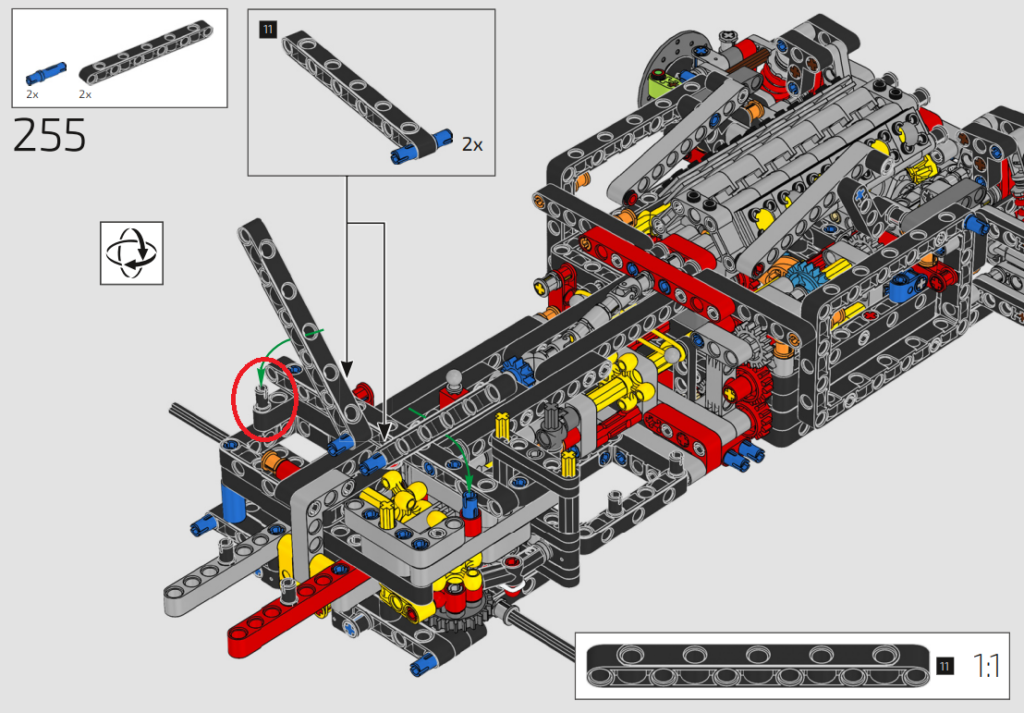
Step 255 (not fixed yet)
There’s an L beam with blue and black pins added at step 250, their position is correct. At step 255 the position of the black pin is shown incorrectly, it should be in the hole closer to the horizontal beam as it was shown correctly in the previous steps:
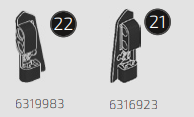
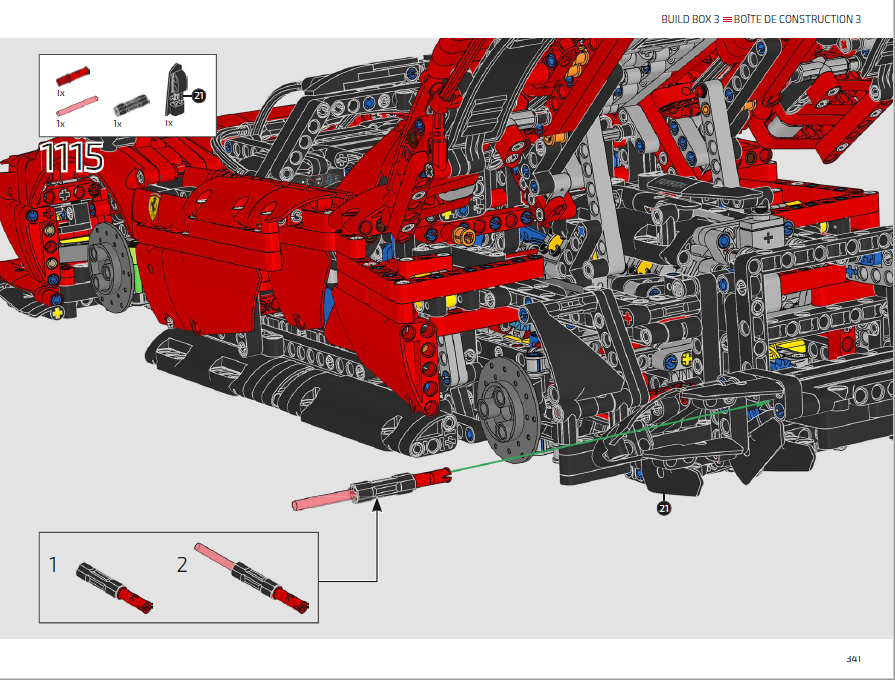
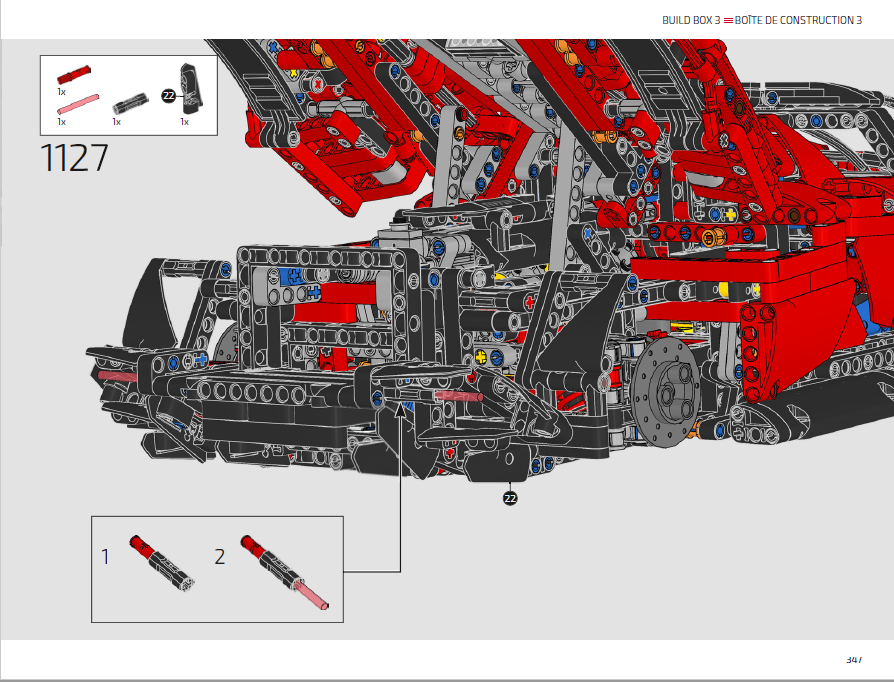
Step 1115 & 1127 (fixed)
There are 2 black small panel fairings (#21 and #22) that you will find in the box and also in the inventory, but they are not used in the paper instructions:
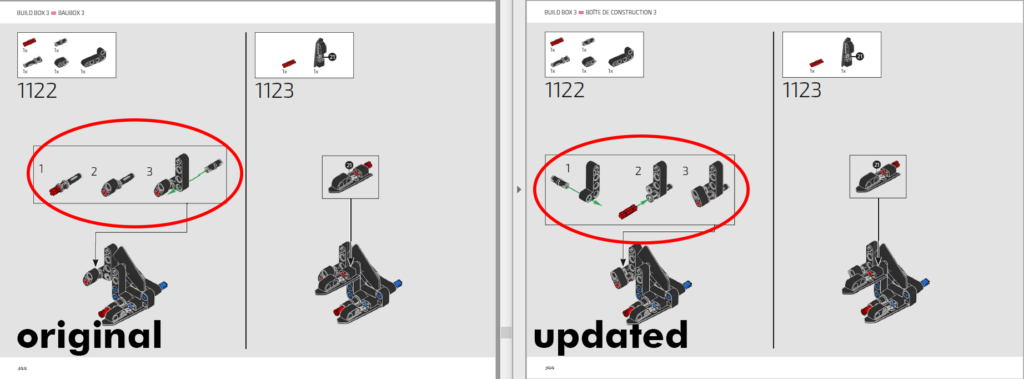
Step 1122 (fixed)
There was an error in this step, compared to step 1110 the sub-assembly was not mirrored properly, now it is fixed:
Step 1267 (not fixed yet)
The 1×2 bricks holding the L Technic beam cannot be attached in this exact position to the plate, they have to be shifted half stud towards the upper edge:
Haven’t got this set yet?

Check out here…
Choose your local online LEGO Store below to get the 42143 Ferrari Daytona SP3.
lego.com US / lego.com UK / lego.com AU
Disclaimer: the post contains affiliate links, they won’t cost you extra money but any purchase made through them might help to run the site with a small commission.


Pingback: LEGO fixes some (not all) errors in the 42143 Technic Ferrari Daytona SP3 manual - read before you build! - Jay's Brick Blog
The wrong part was included in the packet for step 384. 6293391 is needed and 4543489 was included. I did find the right part in another packet. I hope this won’t cause problems as I continue with assembly.
1/8 scale? Wow!
And 42123 is McLaren Senna GTR
Built the Senna GTR recently ♥️
Step 241 also had an error. The knob gears need to be in a X position or you can’t put the piece all the way down. The position change you mentioned in step 240 also makes this work…. otherwise these pieces would not fit between the other 2 knob gears.
I was building the ferrari before, and passed step 88 without noticing. I am now later in the build. Will it still function or will I have to take it apart to make the gears shift?
Gear shifting should work, but not in the correct order. Honestly I would not bother going back, as the gear differences are hardly noticeable anyway.
I have made it to step 88 and one of the orange wave selectors does not continue to spin and stops at certain points both directions, is this supposed to happen because its slightly worrying
It shouldn’t happen, better verify your assembly
I am having this same error, did you manage to fix it?
This happens to me, I had used the wrong color blue gear in previous step.
Same here, used the wrong blue wheel with same dimensions. disassembles more than 100 steps 🙁
Which step? Thanks!
I’ve been building this with the online instructions, I must say some of their “make this little assembly and put here” steps are bloody difficult to follow. So many angles with piss poor views of where things need to connect up.
I’ve done the Porsche, Bugatti and Sian. This has been quite challenging to assemble. last set of bags to do tomorrow.
I’m glad I am not the only person who has found this. Also done the previous ones you mention and definitely found this one more fiddly.
Also found missing parts which is REALLY annoying
You are totally right. Planned to put a comment on this issue, but you made it already!
Thank Christ step 104 was a known issue, because I spent half the night looking for the wrong piece, before finally settling on an attitude of “screw it. I’ll use the one that’s got the X”.
Good for you, I went down the avenue of raising a request for a missing piece and had to wait two weeks, so excited when the replacement arrived, just to find it was the wrong piece! FFS
Found 2 more missing parts last night. This is the most frustrating Christmas present ever, feel really let down
It is almost impossible statistically to have multiple missing pieces in different bags of the same set. Most of the times you either misplace it, drop it, use it instead of something else, leave it in the bags etc.
Now if there was only a fix to get the engine cover to stay up and the doors to stay open that would be nice.
Just finished box 2 and I noticed the suspension for the front is significantly taller than the suspension at the back. Is this a normal part of the build or have I done something wrong?
no that’s normal, the suspension is designed in a way where the car is on a slight angle, with the rear of the model higher than the front. its like that as it reflects the suspension on the real thing
I think there’s another small mistake on step 813 : it says 4 pieces, but they’re only 2.
Awesome, thanks for clarifying
Hi! Step 978/979 is also wrong and not fixed on PDF (the image of parts is not correct)
Step 813 has two mistakes. Only need two little red spaghettis and 3 of 6381444.
This set has just been bought for me as a Christmas present. After reading about the mistakes, I’m unsure if I should return it to Amazon. I want to enjoy building this but I’m afraid that won’t be the case due to the errors that have been mentioned.
Any advice?
Why would you return it? Digital instructions are corrected, simply use those.
I haven’t made a set like this before and was a little worried, but if the digital instructions are now fixed, I’ll give it a go 🙂 I’ve made the Porsche 911, Aston Martin, Concorde, and Ghostbusters car, but I think this is technically a big step up.
Am I going to have a problem with step 978/979 as mentioned by Franz4 above?
Thanks.
where does the long red hose piece go in this build – it feels like a random piece to have a leftover but can’t find it in the guide – piece 6396458
It’s on the front of the car
yes thanks, got that one but have a second version – maybe a lucky spare!
If you buy the Ferrari Daytona in the next couple months will the paper Manuel be fixed?
You cannot say it for sure as you don’t know when the box was manufactured