


Update 20/05/2022
I tested the drive train again after keeping the set built for a long time, and also tried if the new improved gears could help getting rid of the cracking:

Unfortunately the new gears did not solve the situation either, so I have to say that despite the most careful assembly, the set will start to show the cracking behavior sooner or later.
Introduction
I shared many videos with you about the LEGO Technic Land Rover Defender already, you saw my detailed building review, the details of the drive train and the one about the cracking noise and the possible fixes. I received hundreds of comments from you and many-many requests for help, hopefully in most of the cases I was able to assist to find the proper solution.
I decided to create a summary and a video about all the potential issues I found during the building process. I’ll also go through the drive train from the wheels to the engine, how to verify your build, and what are the problems that are not really problems. Each section is linked to the proper part of the video, use the summery below to find the section you are looking for:
- Introduction
- Drive train walk trough, how does it work
- Body removal guide
- Building errors based on steps
- Step 4 – rear differential direction swap
- Step 45 – gears swapped or not placed correctly
- Step 65 – small cross block inserted incorrectly
- Step 74 – small cross block inserted incorrectly
- Step 84 – small cross block inserted incorrectly
- Step 88-89 – U-joint orientation
- Step 102 – Red 2L axle
- Step 104-106 – rear suspension – lower attachment point of the springs
- Step 134 – front differential direction swap
- Step 152 – front suspension – lower attachment point of the springs
- Step 259-261 – correct assembly of the DNR and Hi/Lo selectors
- Building errors based on the symptoms
- Cannot connect the two assemblies properly at step 62
- Rear wheels are blocked when the car is pushed forward – mistake at step 65
- Gears does not fit properly at step 45
- All wheels are blocked when turned together – possible issue at step 84
- Front and rear wheels turn against each other when the central differential is manually turned – differential direction swap at the front or at the rear
- Gearbox and fake engine does not work at all – possible differential direction swap at the front or at the rear
- Cracking noise in the drive train – U joints not aligned properly at step 88-89 or U joint touches the 24 tooth gear at step 272
- Suspension seems to be soft, the front axle or the rear axle of the car sits down
- Verification steps
- General advises
- Problems that are not really problems
- What to do if everything is built correctly and the gears are still cracking
Drive train walk trough, how does it work

I go through the drive train from the wheels up to the engine to demonstrate how it works. I suggest to watch it to have a better understanding on the mechanism, it helps to find the issue with your build.
Body removal guide
This section shows you how to remove the body of the car in bigger pieces to gain access to the internals
Building errors based on steps
Step 3 – incorrect gear used, issue at step 62
Error: a 12 tooth black gear is used at step 3 instead of the 8 tooth dark bluish gray gear
Symptom: the two assemblies cannot be properly joined at step 62, the axle won’t turn
Step 4 – rear differential direction swap
Error: The orientation of the differential is important at step 4
Symptom: If one of the two differentials is built in reversed then the front and rear wheels will work against each other and the central differential won’t turn, it won’t drive the gearbox and the engine. Click here to see how does it look like.
How to fix with a finished build : Follow these instructions:
Step 45 – gears swapped or not placed correctly
Error: If incorrect gears are used at step 45 then the assembly cannot be completed
Step 65 – small cross block inserted incorrectly
Error: a common mistake that can be made a lot of times in this build. If the #6536 Technic cross block is inserted incorrectly then the axle that supposed to turn freely in the pin hole will be blocked in the axle hole.
Symptom: The rear wheels does not turn when the car is pushed on the ground as the output of the rear differential is blocked
How to fix with a finished build : Follow these instructions:
Step 74 – small cross block inserted incorrectly

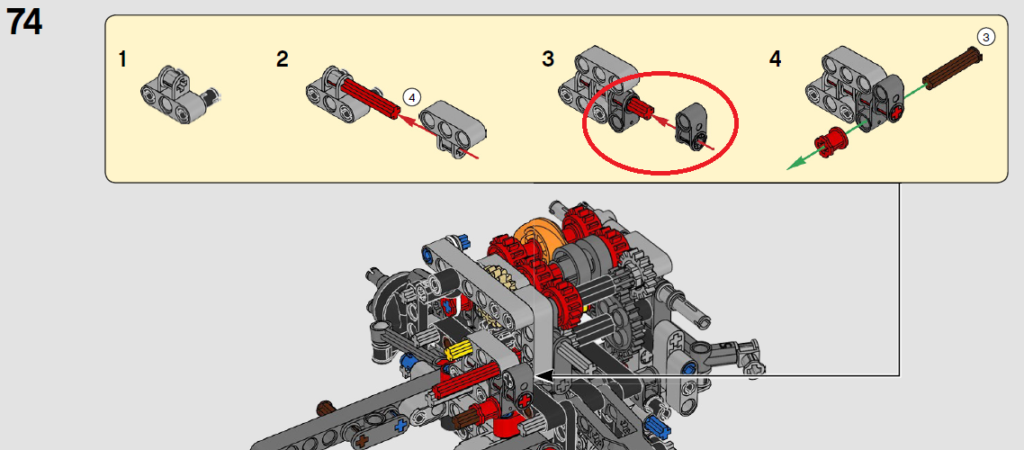
Error: a common mistake that can be made a lot of times in this build. If the #6536 Technic cross block is inserted incorrectly then the axle that supposed to turn freely in the pin hole will be blocked in the axle hole.
Symptom: The central differential or the gearbox is blocked
Step 84 – small cross block inserted incorrectly
Error: a common mistake that can be made a lot of times in this build. If the #6536 Technic cross block is inserted incorrectly then the axle that supposed to turn freely in the pin hole will be blocked in the axle hole.
Symptom: The central differential is blocked
Step 88-89 – U-joint orientation
Error: if the universal joints on the input and output shafts of the gearbox are not aligned correctly
Symptom: the drive train will not run smoothly and in higher gears you’ll hear a cracking noise.
How to fix with a finished build: Follow these steps:
Step 102 – Red 2L axle
Error: if the 2L red axle is not pushed in then the some beams will not be linked together and the structure becomes unstable
Step 104-106 – rear suspension – lower attachment point of the springs
Error: The lower attachment point of the springs in the rear suspension are chosen incorrectly, the inner hole is used on the suspension arm instead of the outer axle hole
Symptom: the suspension will not work properly and the whole rear of the car will sit lower than the front
How to fix with a finished build: follow these steps:
Step 134 – front differential direction swap
Error: The direction of the differential is important at step 134
Symptom: If one of the two differentials is built in reversed then the front and rear wheels will work against each other and the central differential won’t turn, it won’t drive the gearbox and the engine.
How to fix with a finished build : Same as the fix for Step 4
Step 152-154 – front suspension – lower attachment point of the springs
Error: The lower attachment point of the springs in the front suspension are chosen incorrectly, the inner hole is used on the suspension arm instead of the outer axle hole
Symptom: the suspension will not work properly and the whole front of the car will sit lower than the rear
How to fix with a finished build : Same as the fix for Step 104-106
Step 259-261 – correct assembly of the DNR and Hi/Lo selectors
Error: the assembly of the DNR and the Hi/Lo selector requires a lot of parts to be aligned correctly, if there’s a mistake they won’t work properly
Step 271 – correct gear usage
Error – if the dark bluish gray 8 tooth gear is not added at step 271 or an incorrect one is used then the front wheels won’t drive the central differential
Symptom: The front wheels are not driving the central differential
Step 272 – U joint should not touch the 24 tooth gear
Error: The U-joint on the input shaft of the gearbox is placed incorrectly and it touches the 24 tooth gear next to it
Symptom: Cracking noise coming from the drive train
How to fix with a finished build: Follow these steps:
Verification steps
I suggest to follow these verification steps to see if everything works correctly at that stage.
What shall work at the end of bag 1 at step 123
Verification of all functions at step 321
General advises
- There should be no bigger pieces or gears left after any building stages. You can see the list of the leftover parts here at the end of the inventory. If you have any bigger parts left after finishing a section go back and find where it belongs.
Problems that are not really problems
Left/right or front/rear wheels are turning in the opposite direction
Step 62 – wheels are not turning the gears in the gearbox
At this stage the wheels are not yet connected to the gearbox
End of bag 1 – wheels are not turning the gears in the gearbox
At this stage the wheels are not yet connected to the gearbox
What to do if everything is built correctly and the gears are still cracking
As you see in the video, if the car is still cracking then the best solution is to take it apart and try to rebuild it with everything aligned properly. There’s no ultimate fix for the cracking, you need to verify each section carefully to ensure a smooth operation.
There is one additional thing you can try to fix the cracking if everything else fails, although this falls in the “might or might not work” category. For some people flipping both differentials at the front and rear axle eliminates the cracking.
Haven’t got this set yet?


Check out here…
Choose your local online LEGO Store below to get the LEGO Technic 42110 Land Rover Defender.
lego.com US / lego.com UK / lego.com AU
Disclaimer: the post contains affiliate links, they won’t cost you extra money but any purchase made through them might help to run the site with a small commission.


